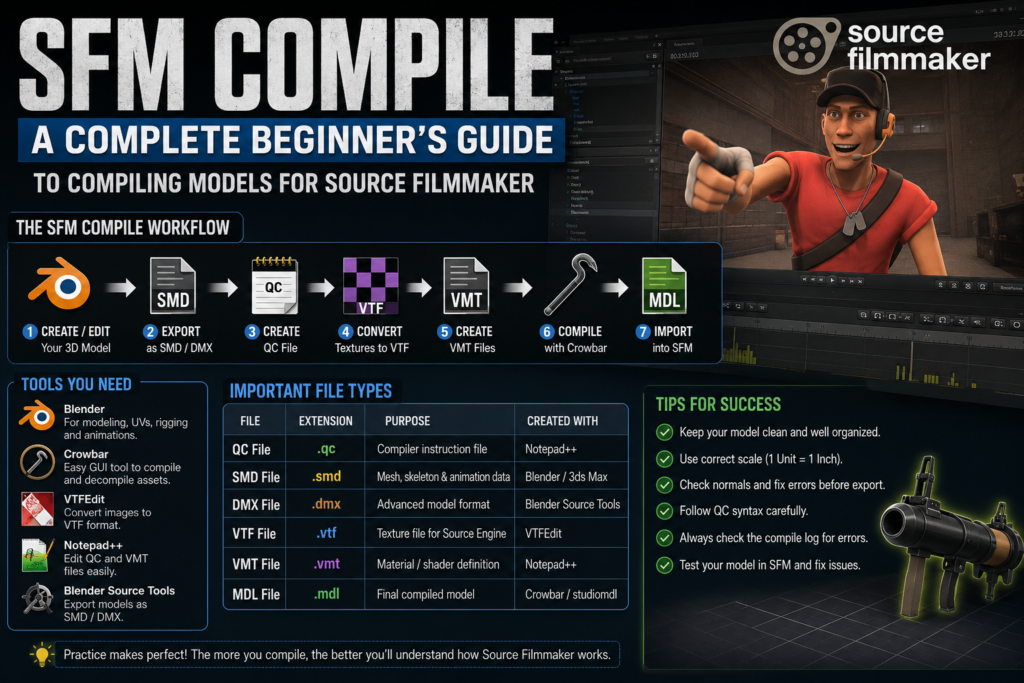
Source Filmmaker, commonly known as SFM, has become one of the most popular tools for hobbyist animators, meme creators, and 3D artists who want to bring characters and scenes to life using Valve’s Source engine assets. But before any custom model, prop, or character can appear inside SFM, it needs to go through a process called “compiling.” If you have ever searched for “SFM compile” and felt overwhelmed by technical jargon, this guide breaks the entire process down into simple, practical steps.
What Does SFM Compile Actually Mean?
In simple terms, compiling is the process of converting a 3D model created in software like Blender, 3ds Max, or Maya into a format that Source Filmmaker can read and render. This final format is known as an MDL file. Without compiling, a raw 3D model file cannot be imported directly into SFM because the engine only understands its own proprietary structure.
The compiling process involves several supporting files working together, including QC files, SMD or DMX files, and VTF or VMT files for textures. Each of these plays a specific role in telling the Source engine how the model should look, move, and behave inside the animation environment.
Quick Overview Table: Key File Types in SFM Compile
| File Type | Full Form / Purpose | Created Using |
|---|---|---|
| QC | Instruction file that guides the compiler | Text editor (Notepad++) |
| SMD | Stores mesh, skeleton, and animation data | Blender / 3ds Max export |
| DMX | Newer alternative to SMD with more data support | Blender Source Tools |
| VTF | Valve Texture Format for images | VTFEdit |
| VMT | Material file defining texture behavior | Text editor |
| MDL | Final compiled model usable in SFM | Compiler (studiomdl / Crowbar) |
Why Compiling Is Such an Important Step
Many beginners assume they can simply drag and drop a 3D model into SFM the same way they would in other animation software. Unfortunately, that is not how the Source engine works. Compiling ensures that:
- The model’s geometry is properly optimized for real-time rendering
- Textures and materials are correctly linked to the mesh
- Skeletal rigging and bones are recognized for animation purposes
- Collision meshes and hitboxes are generated if needed
- The file size is reduced and made efficient for the engine
Skipping or mishandling this step is one of the most common reasons new SFM users run into missing textures, broken rigs, or models that simply refuse to load.
Tools You Need Before You Start
Before diving into the compiling process, it helps to gather the right software. Most creators rely on a combination of the following:
| Tool | Purpose | Beginner Friendly? |
|---|---|---|
| Blender / 3ds Max | Creating or editing the base 3D model | Yes (with plugins) |
| Crowbar | GUI-based compiling and decompiling tool | Very Easy |
| VTFEdit | Converts images into VTF texture format | Easy |
| Notepad++ | Writing and editing QC files | Easy |
| GCFScape | Extracting existing game assets for reference | Moderate |
| Blender Source Tools | Plugin for exporting SMD/DMX from Blender | Easy |
Having these tools ready before you begin will save a lot of frustration later in the process.
Step-by-Step Process for SFM Compile
Step 1: Prepare Your Model
Start by making sure your model is clean, has proper UV mapping, and is exported in a compatible format such as SMD or DMX. If you are working with Blender, plugins like Blender Source Tools make exporting significantly easier.
Step 2: Create a QC File
The QC file acts as the instruction manual for the compiler. It tells the engine which SMD files to use, where to find the textures, how the model should be scaled, and what physics properties it should have. A basic QC file includes commands for the model name, body groups, texture directories, and sequences for animation.
Step 3: Set Up Your Textures
Textures must be converted into VTF format, and a matching VMT file needs to be created for each texture. The VMT file defines how the texture behaves, including shading, transparency, and shaders used.
Step 4: Run the Compiler
Once your QC file and textures are ready, you can use Crowbar or the command line studiomdl tool to compile everything into an MDL file. If there are errors in your QC file or missing textures, the compiler will usually generate a log explaining what went wrong.
Step 5: Test Inside SFM
After compiling, import the model into Source Filmmaker to check if it loads correctly, animates smoothly, and displays textures properly. If something looks off, you may need to go back and adjust your QC file or texture paths.
Quick Reference Box: Compiling Workflow at a Glance
- Prepare and export model (SMD/DMX)
- Write QC file with correct paths
- Convert textures to VTF and create VMT
- Run compiler (Crowbar or studiomdl)
- Check compile log for errors
- Import and test inside SFM
- Fix issues and recompile if needed
Common Errors During SFM Compile and How to Fix Them
Even experienced animators run into compiling issues from time to time. The table below summarizes the most frequent problems and their typical solutions.
| Error / Symptom | Likely Cause | Suggested Fix |
|---|---|---|
| Missing texture error | Incorrect VMT file path | Match material folder paths exactly |
| Purple and black checkerboard | Texture failed to load | Recheck texture naming and directory |
| Model appears invisible | Flipped normals or wrong scale | Fix normals in Blender, adjust QC scale |
| Compiler crashes midway | Corrupted SMD export | Re-export model, update plugin version |
| Bones not animating properly | Skeleton mismatch | Match bone structure with base rig |
| Model loads but has no collision | Missing physics mesh in QC | Add $collisionmodel command properly |
Taking time to read the compiler log carefully instead of skipping past it will save hours of guesswork.
Understanding the QC File a Little Deeper
Since the QC file is the heart of the SFM compile process, it is worth understanding its most common commands. Below is a simplified breakdown that beginners often find useful for reference.
| QC Command | What It Does |
|---|---|
| $modelname | Defines the output name and folder path of the MDL file |
| $body | Links the SMD file to the model’s body group |
| $cdmaterials | Specifies the folder path where textures are stored |
| $sequence | Adds animation sequences to the model |
| $surfaceprop | Defines physical surface properties like metal or flesh |
| $collisionmodel | Adds a physics collision mesh to the model |
| $scale | Adjusts the overall size of the model during compiling |
Even a small typo in these commands can cause the entire compile to fail, so double-checking syntax is always a good habit.
Tips to Make Your SFM Compile Process Smoother
If you want to avoid repeated headaches every time you compile a new model, keep these practical tips in mind:
- Always keep your folder structure organized and consistent, since Source engine paths are case sensitive and strict about directory naming
- Back up your original QC files before making major edits so you can revert quickly if something breaks
- Use Crowbar’s built-in compile log viewer to catch errors early instead of guessing
- Keep texture resolutions reasonable, since overly large files can slow down both compiling and rendering inside SFM
- Test your model with basic default animations first before adding custom rigs, so you can isolate whether an issue is related to the model or the animation itself
- Keep a personal notes file documenting fixes you discover, since many compiling errors tend to repeat across different projects
Beginner vs Advanced Compiling: A Simple Comparison
| Aspect | Beginner Approach | Advanced Approach |
|---|---|---|
| Tool used | Crowbar (GUI) | Command line studiomdl |
| QC file editing | Copy and modify templates | Write custom QC from scratch |
| Texture handling | Basic VTF conversion | Custom shaders and normal maps |
| Rigging | Use existing skeletons | Build custom bone hierarchies |
| Troubleshooting | Trial and error | Reading compiler source logs in depth |
This comparison shows that while beginners can absolutely get started with basic tools, there is plenty of room to grow into more advanced, customized workflows over time.
Why Learning to Compile Manually Still Matters
With the rise of pre-compiled model packs and community-shared assets, many newcomers to SFM never actually learn the compiling process themselves. While using ready-made assets is a great way to start, learning how SFM compile works gives you far greater creative freedom. You will be able to bring in original characters, convert models from other games, or customize existing assets exactly the way you envision them, rather than being limited to what is already available online.
Understanding the compiling pipeline also makes troubleshooting much easier. Instead of being stuck when a downloaded model does not work properly, you will have the knowledge to open the QC file, inspect the material paths, and fix the issue yourself.
Best Practices Checklist Before Final Compile
- Confirm all texture files are converted to VTF format
- Verify that VMT files point to the correct texture names
- Check that the QC file references correct SMD file names
- Make sure bone names match between model and animations
- Test model scale before finalizing compile
- Keep a backup copy of the uncompiled source files
- Read through the compile log fully, even if no errors are shown
Following a checklist like this before hitting compile can save significant time, especially on larger or more complex projects.
Final Thoughts
Compiling models for Source Filmmaker might seem intimidating at first glance, especially with all the technical terms like QC files, SMD exports, and VTF textures. However, once you break the process down step by step, it becomes a manageable and even rewarding part of the animation workflow. Every successful SFM compile brings you one step closer to having full creative control over your animations, characters, and scenes.
Whether you are a beginner experimenting with your first custom prop or an experienced animator refining a complex character rig, mastering the compile process is a skill that will consistently pay off. Take your time, follow the steps carefully, and do not be discouraged by the occasional error log. With practice, compiling models for SFM will start to feel like second nature.
Frequently Asked Questions
Is Crowbar necessary for SFM compile, or can I compile using command line only?
Crowbar is not mandatory, but it makes the process significantly easier for beginners by providing a visual interface instead of requiring manual command line entries.
Can I compile models made in software other than Blender?
Yes, as long as your 3D software can export to SMD or DMX format, or you convert the files using a compatible plugin, you can compile models from most major 3D modeling programs.
Why does my compiled model look fine in Blender but broken in SFM?
This usually happens due to texture path mismatches, incorrect scaling, or missing bone assignments that only become visible once the model is processed through the Source engine’s compiler.
How long does an SFM compile usually take?
For simple props, compiling can take just a few seconds. Complex characters with detailed rigging and multiple textures may take a minute or more, depending on system performance.
Do I need to recompile every time I make a small change?
Yes, any change to the mesh, textures, or QC file requires a recompile for those changes to appear inside Source Filmmaker.